I was born in Manila, and as a chef, I wish I could say that I cook amazing Filipino food, but I’ve mostly cooked Western food my entire life. One thing I could say is, I have tried to incorporate Filipino flavours especially in baking. Although sometimes, that feels a little bit like taking the easy way out. I am proud of my heritage, and maybe someday I would go back and learn more about native ingredients and incorporate them in my cooking as well.

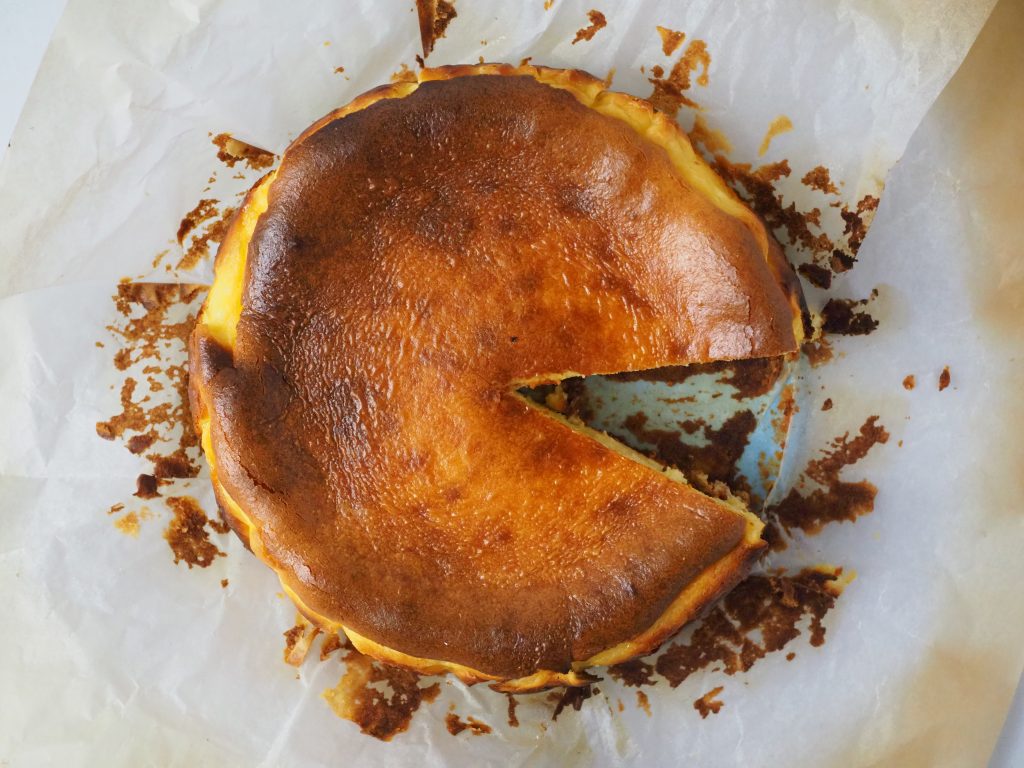
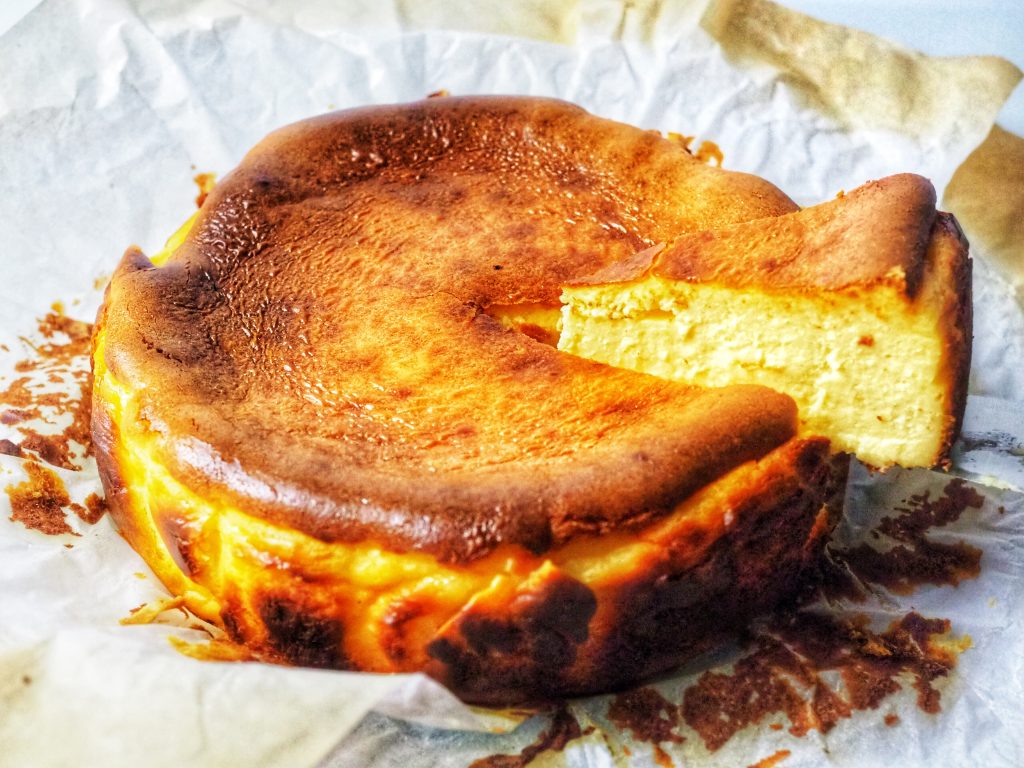
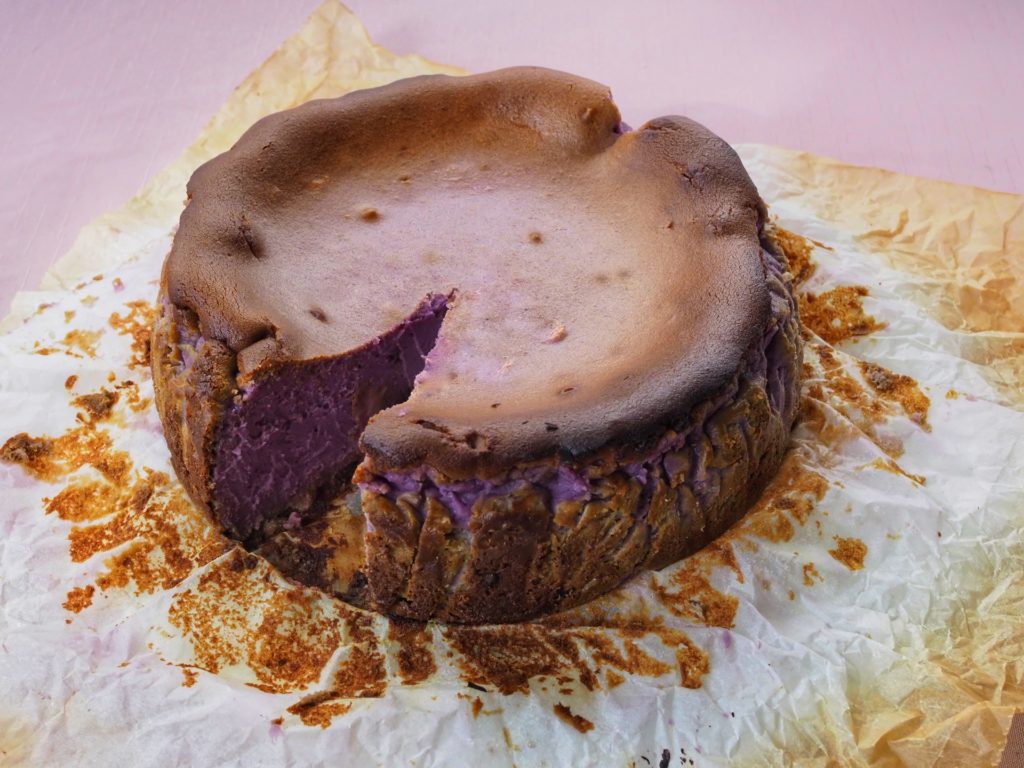
Here, I’m sharing with you my ube cheesecake recipe La Viña style. What is it? You know how a crustless, burnt cheesecake have been trending for a few years? One that is more commonly know as Basque Cheesecake? Well, this is the ube version, with homemade ube jam as well. I call it La Viña cheesecake because that’s the name of the restaurant in San Sebastian where people flock to have a taste of the original version. It is a crustless cheesecake that is caramelised outside and soft in the middle.


View this post on Instagram


A post shared by Joanne | Mrs.FancyPants (@mrs.fancypants.recipes)

If you want the original recipe as per the video above, I published my easy to follow recipe here. Just remember whichever version you are making, start with room temperature ingredients so the batter incorporates quickly and you will not get a lumps. The idea is to get a caramelised outside that serves as your crust, so this entails baking at a very high temperature. I preheat my oven to 220C and line a 23cm or 9in springform with baking paper and ensure there is an overhang. The overhang protects the cheesecake from getting too burnt too fast, and it also supports the cheesecake when it puffs up, which prevents overflowing.

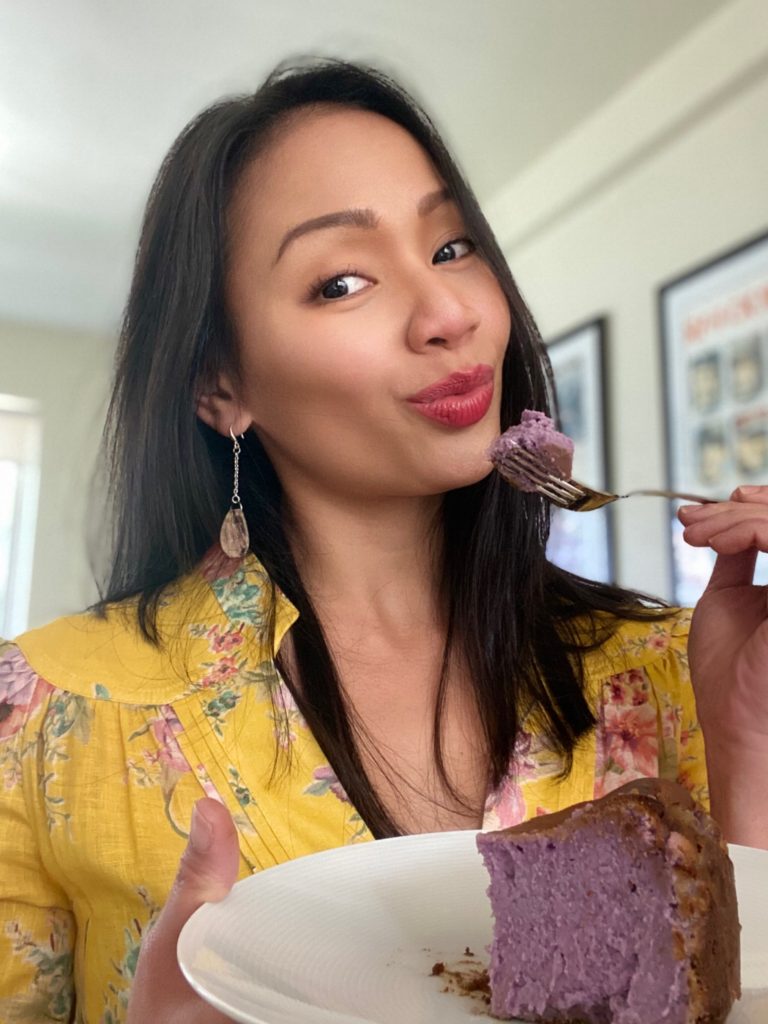
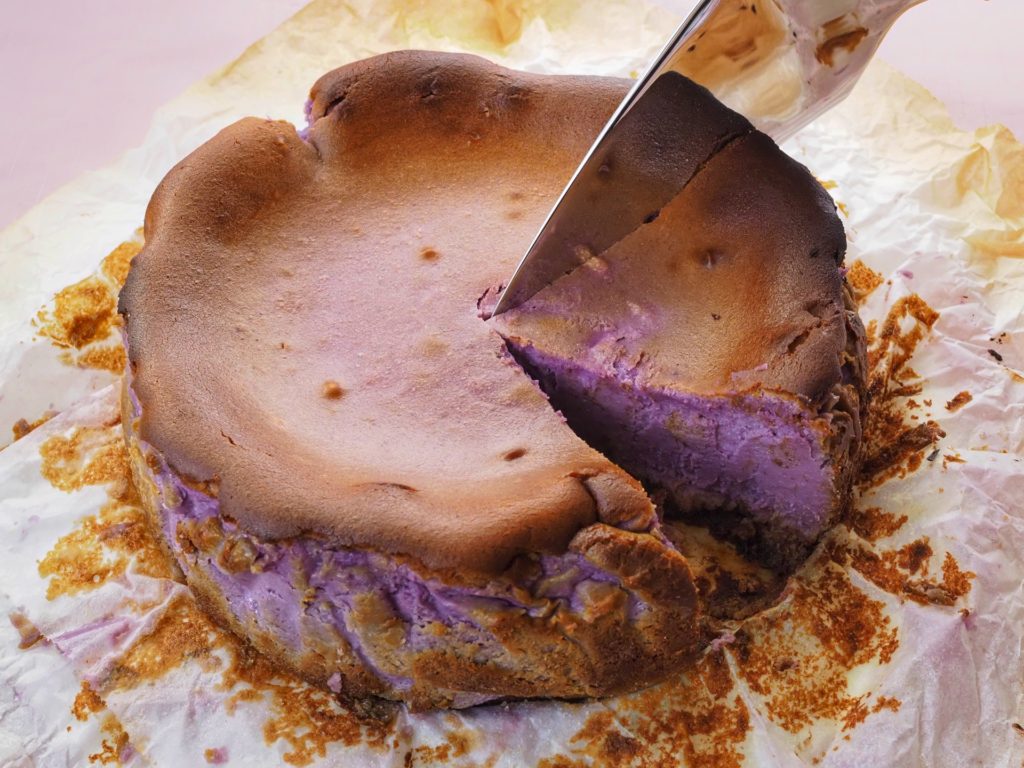
Now with the ube version, it is also straightforward to make with the addition of making your own ube jam. Why would you want to make an ube version? Because my recipe of this is absolutely delicious and the natural purple colour of ube gives this (and basically most ube desserts) a really pretty purple hue. Ube jam is basically cooked ube, pureed and mixed with milk and sugar and cooked until its thick like peanut butter or Nutella. Let your ube jam cool to room temperature before using it for the cheesecake. I use all the ube jam yield in this recipe, but feel free to double the batch because it is really nice on warm bread rolls with a touch of butter.

To make the cheesecake, combine the ube jam, cream cheese, eggs, cream and sugar in a large bowl. Mix until smooth then sift over flour and fold in until incorporated. Pour the batter in your lined springform and bake for 1 hour. The cheesecake will still be jiggly in the centre. Remove from oven and let cool on a rack for at least 2 hours. Serve at room temperature to retain that soft, custardy texture. If you have leftovers, you can eat it as is or reheat in the microwave for 10sec per slice to get that softness back.

The detailed recipe is below for you to try. I would love to see your finished products, so tag me on your social media posts @mrs.fancypants.recipes or use #mrsfancypantsrecipes. If you have any questions, feel free to comment below. ???? Happy baking!

 
Difficulty: Easy

Ube Cheesecake à la La Viña

Makes 1 x 23cm springform

My ube variation of the famed Basque burnt cheesecake!

Ingredients

    For the ube jam (halaya)
  • For the cheesecake

Instructions

0/7 Instructions
    First make the ube jam:
  • Place ube and water in a small saucepan. Bring to a boil over medium heat, lower heat to a simmer, and cover. Simmer until ube most of the water has evaporated.
  • Remove from the pan and transfer to a large bowl. Use a masher to finely mash the ube, or if using grated ube, this step shouldn't be necessary. Push through a fine sieve for a really smooth texture, optional.
  • Mix together mashed ube, milk, and sugar then transfer to a frying pan. Cook over low heat, stirring constantly to avoid burning for 30 minutes uncovered. Add butter cubes and continue cooking until the ube has a deep purple colour and very thick consistency similar to peanut butter spread. Cool down to room temperature.
  • Make the cheesecake
  • Start with room temperature ingredients. Preheat oven to 220C. Line a 9” springform with baking paper, make sure you have an overhang of at least 5cm.
  • Mix cream cheese, ube, sugar and cream. Add eggs one by one, fully incorporating after each addition. Sift flour into the batter and mix just until the flour is incorporated. Do not over mix.
  • Pour into the pan and bake for 60 minutes. The top should be caramelised but cheesecake should be jiggly.
  • Take out of the oven and rest for at least 2 hours at room temperature. Serve warm, consume immediately. (see notes if making ahead)

Notes

  1. Note on UBE: This can be purchased from Asian/Filipino stores. If fresh ube is unavailable, you can use grated ube.
  2. Note on milk: I use jersey cow milk because there's no carabao milk available in Australia. But you can use normal full cream milk from the supermarket. Light or skim milk doesn't give the same richness to the ube jam.
  3. For leftovers: If you have leftovers, you can eat it as is or reheat in the microwave for 10sec per slice to get that softness back.
  4. Update on sweetness: To make the cheesecake less sweet, you can reduce the sugar in the ube jam by 50g.

https://youtu.be/N_zmg0HuKoE

You have not met a cheesecake as pretty as this! Lighter than your average cheesecake, this is set with chocolate ganache. There are many ways to make a no-bake cheesecake, but I have 2 trusted ways to make my version.

Version 1:

A few years ago Valrhona introduced a new line of products called Valrhona Inspiration. These are different chocolates flavoured with various fruits and nut, and I use this for my no-bake cheesecakes these days. I call this the Valrhona Inspiration Cheesecake.

Version 2:

This is the version I am sharing today. This is the original method of how I made my cheesecake before Valrhona Inspiration came along. This one uses white chocolate ganache, and you can use any kind of baking white chocolate. The flavour and colour come from pureed (blended) strawberries, and the good thing is, both frozen and fresh strawberries will work in this recipe, so use whichever one you prefer.

What is a ganache?

Ganache is a term used for a mixture of chocolate and cream. There are different ratios for ganache depending on it’s purpose, a higher ratio of chocolate to cream makes a firmer ganache that can be used for truffles and tart fillings while the opposite results to a runnier ganache that is great for dips, sauces and glaze.

What is the purpose of ganache in this recipe?

There are plenty of ways to make a no-bake cheesecake, and the main difference lies on what sets the cheesecake. Baked cheesecake have eggs in them that act as a binder, however, there are no eggs in this recipe. Some recipes use gelatine to set the cheesecake but I find that tricky, because there are different gelatine strengths. Other recipes use whipped cream but whipped cream gradually loses it’s stiffness resulting to your cheesecake softening. However, I found that using white chocolate ganache not only adds a nice flavour to the cream cheese, it also sets it beautifully and gives it a smooth texture and the cheesecake holds together better.

Now that you know how the recipe works, it’s time to get the bowls and whisks ready and try my recipe! I wrote it as easy to follow as possible, but if you still have questions, please feel free to ask in the comments section below. This takes longer to set than a cheesecake made with gelatine but the taste develops and it is actually better the next day. One last thing, if you want a brighter pink hue, a drop or 2 of food gel colour is all it takes.

Happy baking!

 
Difficulty: Easy

No-bake Strawberry Cheesecake

Makes 1 x 20cm springform pan

Ingredients

    For the crust
  • For the strawberry puree:
  • For the filling
  • Optional for serving

Instructions

0/8 Instructions
    Make the crust
  • Using a food processor, blend the cookies into fine crumbs. Slowly add the brown butter. Mix until it resembles wet sand.
  • Take a 20cm (8in) round springform pan and press crumbs into the bottom and all the way up the sides with the back of a measuring cup. Chill until filling is done.
  • Prepare the chocolate
  • Place the chocolate in a medium bowl. In a small sauce pan bring the cream to the boil and pour on top of chocolate. Let sit for a minute. Stir vigorously with a wooden spoon or mariz (rubber spatula) until smooth. Set aside to cool down.
  • Prepare the strawberry puree
  • If using frozen strawberries, thaw the strawberries completely. Cut into smaller pieces and remove any stems. Place strawberries and lemon juice in the blender jug and blend into a smooth puree. Set aside.
  • Make the filling
  • In the bowl of your stand mixer fitted with a whisk attachment, or a large mixing bowl with a handheld mixer, whisk cream cheese on medium speed until fluffy then add strawberry puree then whisk for 1 minute. Turn up mixer to high speed then add sugar a spoonful at a time and mix until smooth.
  • Turn mixer down add the melted chocolate and cream mixture (ganache). Then whisk on high until smooth. Pour filling into prepared pan, then with a hot offset spatula or spoon, flatten the top. Chill to set for at least 8 hours or overnight.
  • To serve
  • Whip cream and vanilla until medium peaks. Refrigerate until ready to serve. The cheesecake is ready when it is hard to the touch and fully set.
  • Unmold the cheesecake from the springform pan carefully. Run a knife under hot water and slice cheesecake into 12 portions. Wipe knife after each stroke. Serve with a dollop of whipped cream and fresh strawberries (if using).

Notes

  1. Measurement is based on yield after the unsalted butter has been cooked. Please watch this video on how to make brown butter or beurre noisette.


You might have heard and seen photos of a burnt cheesecake in your social media in the last couple years. This was made famous by a small bar in San Sebastian, Spain called La Viña. I mentioned before how my friends and I love cheesecakes. I remember going to New York and heading straight to Junior’s cheesecake in Manhattan, but this cheesecake is not like the NY Baked cheesecake. This one is crustless, light, soft in the centre and for me, tastes a bit like a Portuguese egg tart because it contains plenty of eggs. I refer to New York because I’ve never been to San Sebastian, but I know exactly what my first stop would be when I finally visit.

Since I’ve never been to the birthplace of the burnt cheesecake, I did plenty of research and found a video by Santiago Rivera who is the chef behind the La Viña Cheesecake. I kindly asked a friend to translate the video and from there the only thing that’s left was for me to trial which springform size to use because it wasn’t specified. The original recipe is as follows:

Original La Viña Cheesecake Recipe

  • 1 kilogram cream cheese (I used Philadelphia because that’s what was available, it’s rumoured that the original uses San Millan cream cheese)
  • 400 grams sugar
  • 7 eggs (I used large eggs because that’s the standard)
  • 1/2 liter cream (I used pure cream which has minimum 35% fat)
  • 1 1/2 spoon plain flour

In the video, Santiago Rivera used a spoon to mix the cream cheese and sugar, then added eggs one at a time. He then added the flour and finally the cream. He pours the mix into a springform pan and bakes at 210C for 40 minutes. You can watch the video I’m talking about below, I found it on a European online radio and TV channel EITB.eus.

I made the cheesecake as instructed above and settled on a 26cm springform. It’s creamy, and custard-like, and I find a lot of people find it too eggy for a cheesecake. I personally love it. It reminds me of a Portuguese egg tart and a Japanese cheese tart, but without the shell. If you haven’t tried the original, I suggest you make it at least once, because really, what’s the point of jumping on the burnt cheesecake bandwagon when you are clueless on what the original actually is like.

The goal is for the cheesecake to be dark brown outside while preserving the soft and creamy centre. To do this, you need to bake the cheesecake at a high temperature. This cheesecake is beautifully rustic, and very photogenic, as you can see from my photos above.

My version is a tad smaller than the original and baked in a 23cm springform instead of 26cm. Because of this, I adjusted the the temperature for the same baking time. I also added vanilla and lemon for flavour. You can find my recipe below. Try making both and let me know which one you prefer. Don’t forget to tag me on social media when you post your beautiful cheesecakes and use #mrsfancypantsrecipes. Happy baking!

 
Difficulty: Easy Prep Time: 15 Mins Cook Time: 50 Mins Total Time: 1 Hr 5 Mins

Burnt Cheesecake à la La Viña

Makes 1 x 23cm springform

Make the famed Basque burnt cheesecake at home!

Ingredients

Instructions

0/4 Instructions
  • Start with room temperature ingredients. Preheat oven to 220C. Line a 9” springform with baking paper, make sure you have an overhang of at least 5cm.
  • Mix cream cheese, sugar and cream. Add eggs one by one, fully incorporating after each addition. Sift flour into the batter and mix just until the flour is incorporated. Do not over mix.
  • Pour into the pan and bake for 50 minutes. The top should be caramelised but cheesecake should be jiggly.
  • Take out of the oven and rest for at least 2 hours at room temperature. Serve warm, consume immediately. (see notes if making ahead)

Notes

  1. If making ahead, take out of the oven and cool down at room temperature for 1 hour then place in the fridge to cool down completely. Take out of the fridge 30 minutes before serving and serve at room temperature.
  2. I recommend serving this cheesecake warm, if you made this ahead, you can slice into wedges and blast each slice for 15 seconds in the microwave. Serve and consume immediately after.
  3. You can make this gluten free by substituting the plain flour with 1 tsp corn flour/cornstarch. This prevents a lot of cracking, but I've tried making this with no flour and it still works, you just get a bit of cracking around the rim.


I love a good cheesecake, and a lot of people I know do too. The only problem is, they say they get disappointed each time they order a cheesecake for dessert. To be honest, I agree… The cheesecake game is not strong in Sydney, however, I am hoping to change that! My cheesecakes are my most requested dishes to bring to family and friends’ events. I am not joking when I say that since I started selling cakes online, my cheesecakes combined make up 75% of the online orders, not including bespoke events and custom cakes. So if you’re not the bake it from scratch type, check out my kitchen to see my different cheesecakes by clicking the button above or order this cheesecake below!


View this post on Instagram


A post shared by Joanne | Mrs.FancyPants (@mrs.fancypants.recipes)

This recipe is perfect for summer because it doesn’t require an oven, it is also quite easy to make, but it’s essential to use good quality chocolate. I didn’t use any gelatine in this recipe, so the ganache helps set your cheesecake. The recipe is basically mix and chill. Chilling is at least 4 hours to give it ample time to set. This is definitely not gluten-free or dairy-free but since there are no eggs, this is safe for pregnant women.

I love this with seasonal fruit, but you can have it by itself. I you make this, let me know what you think via the comments section below. This is a crowd-pleaser without being too challenging to make, all you need to do is to make sure your ingredients are room temperature! Aside from that, you can keep your ovens off and smile at the fact that there is no chance that this cheesecake would crack. Good luck!

 
Difficulty: Medium

White Chocolate Cheesecake

makes 1 x 20cm (8’ springform)

Ingredients

    For the crust
  • For the filling

Instructions

0/5 Instructions
    First melt the chocolate:
  • Place chocolate in a heatproof bowl. In a small pot, bring cream to the boil then pour on top of the chocolate. Let it stand for a minute then whisk until smooth. Set aside to cool down.
  • Now make the crust:
  • In a large bowl, mix digestive biscuit crumbs and brown butter until it resembles wet sand. Take a 20cm (8in) round springform pan and press crumbs into the bottom and all the way up the sides with the back of a measuring cup. Chill until filling is done.*
  • For the filling:
  • In the bowl of your stand mixer fitted with a whisk attachment, or a large mixing bowl with a handheld mixer, whisk cream cheese on medium speed until fluffy then add yogurt and vanilla then whisk for 1 minute. Turn up mixer to high speed then add sugar a spoonful at a time and mix until smooth.
  • Turn mixer down add the melted chocolate and cream. Then whisk on high until smooth. Pour filling into prepared pan, then with a hot offset spatula or spoon, flatten the top. Chill to set for at least 4 hours.
  • To serve:
  • Top with fresh mango slices, berries, passionfruit pulp, caramelised pineapple, the list is endless. Use a hot knife to cut a slice and wipe it after each time you cut into the cheesecake to get a clean slice.

Notes

  • Graham crackers is not readily available in Australian supermarkets, so I have now adjusted to using digestive biscuits and Oreo cookies for my cheesecake crusts. I use the Oreo cream too, so there’s no wastage. If you don’t like a chocolate crust or if chocolate doesn’t go with your filling, you may use golden Oreos instead, or digestive biscuits are really good. When using Oreos for the recipe, reduce the brown butter to 80g because the cream helps hold the crust together.
  • Measurement of brown butter is based on yield after unsalted butter has been cooked. Please watch this video on how to make brown butter or beurre noisette.
  • If yogurt is unavailable, you may substitute sour cream. I prefer yogurt because it’s texture is lighter than sour cream and cream cheese. 
  • Pressing the crumbs all the way up the springform pan takes practice and patience, so don’t give up on it too easily if you love having good cheesecake to crust ratio. Just take your time and you’ll get the hang of it. If you do not want the crust all the way around the sides of your cheesecake, use only 1/2 of the crust recipe above. This should be enough to cover the bottom plus a few spoonfuls extra for snacking.