My First Sahog @ Home with Filipino Food Movement

Today, I did my first IG Live with Filipino Food Movement. I cooked Filipino sweet and sour fish, or escabeche. And no, I didn’t use cornstarch, or pineapple or ketchup! This is the real deal, I even used fresh tomatoes.

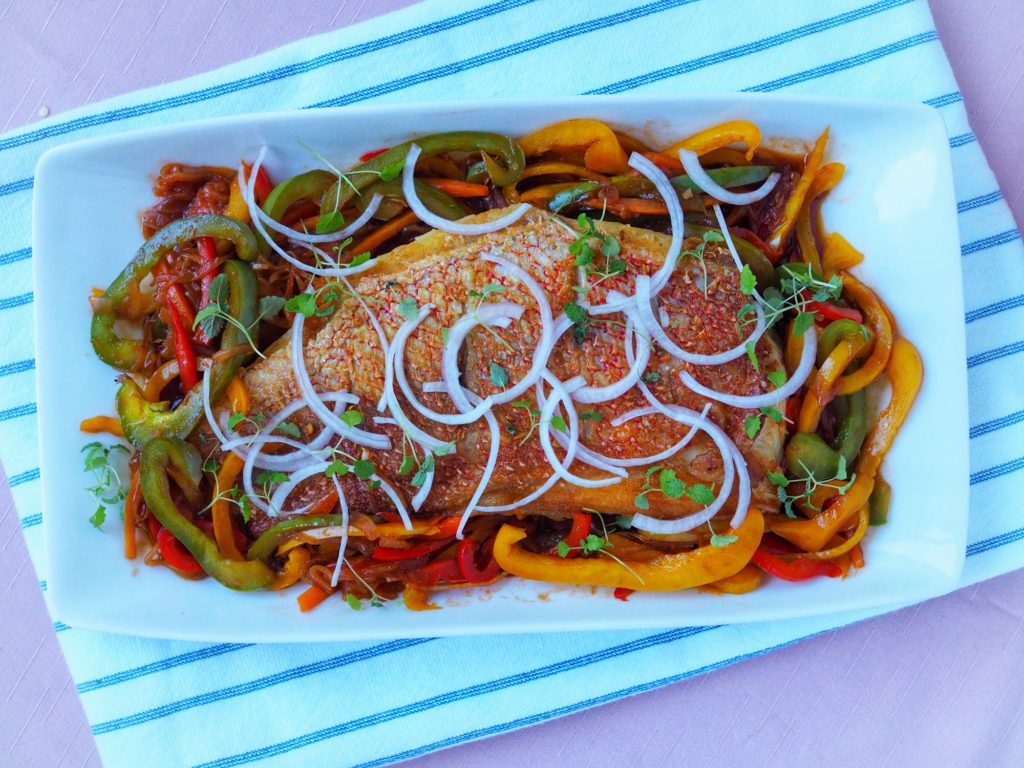
Escabeche is a Filipino dish traditionally consist of fried whole fish, capsicum, onions and sweet and sour sauce. I love making this because it’s easy, quick and delicious! If you’re feeding kids, then you can opt for fillets instead of whole fish so there will be no bones. If you don’t want to fry the fish, you can bake, steam or grill. I’ve tried the sauce on a few white fish and prawns and it’s beautiful. I haven’t tried it on salmon or any oily fish, though. You can make a big batch of sauce and because of the vinegar content, it actually keeps quite well. Although, truthfully, it hasn’t lasted more than a few days in my fridge, so I don’t know how long it would last. I imagine it would be similar to atchara which is pickled vegetables in Filipino. Just make sure you store it in a clean, airtight container.

Watch the video below if you wish to cook along with me. It took about 30 minutes but you can even shorten that by making the sauce in advance.

On the video I used fresh cherry tomatoes. For a quick and economical version that tastes just as nice, you can use a good quality tomato paste. I also like to use sukang iloko because of it’s darker colour and acidity. In Australia, you can get it from your local Filipino store, or you can use sherry vinegar as an alternative. In the Philippines, if you don’t have the options mentioned in your pantry, you can opt for cane sugar vinegar but your escabeche sauce won’t yield the same vibrant colour.


View this post on Instagram


A post shared by FFMA (@filipinofoodmovementau)

Tips on frying fish:

During the live video, I gave a couple of tips on how to best fry fish:

  1. Use a non-stick pan with plenty of room for the fish. The right pan for the job is always important. If you’re worried about food sticking to the pan when frying, then non-stick is your friend.
  2. Hot oil is key but don’t use oil that has a low smoke point like olive oil.
  3. Pat the fish dry and cut a few slits on the skin. Drying the fish and cutting slits on the skin ensures your fish doesn’t curl up when the skin hits the hot oil.
  4. Cook on the presentation side. Whether you took the skin-off the fish or not, there is always a presentation side. When the fish has skin, the presentation side is the skin side, otherwise, it’s the other side. Cook your fish longer on the presentation side until it’s almost done. This gives you maximum colour. Then flip and finish on the other side for a couple of minutes.

Now you’re ready to try my escabeche recipe. It’s super easy, and absolutely delicious, so I hope you give it a shot and let me know what you think in the comments section.

Difficulty: Easy Prep Time: 10 Mins Cook Time: 30 Mins Total Time: 40 Mins

Escabeche

(Filipino Sweet & Sour Fish)

Serves 4

Ingredients

Instructions

0/8 Instructions
  • Slice all the vegetables and ginger into similar size strips or julienne. Mince the garlic.
  • Heat about 3 tbsp cooking oil in a heavy-base sauté pan. Sauté the garlic then add the onion and ginger. Cook until onions and ginger are soft and translucent then add the tomatoes or tomato paste, whichever one you're using.
  • If using fresh tomatoes, cover with a lid and cook down tomatoes for 10 minutes. If using tomato paste, cook out the tomato paste without the lid for 2 minutes.
  • Add the vegetables, stir and cover for 10 minutes until vegetables are soft and tomatoes are breaking down (if using fresh tomatoes).
  • While simmering the sauce, fry the fish. In a wide frying pan with plenty of room for the fish, heat 2 tablespoons cooking oil. Pat fish dry and season with salt. Once the oil is hot, place the fish in the pan and leave until skin is crispy and golden, about 6 minutes, your fish should look almost done.
  • Flip the fish and cook the other side for 1-2 minutes depending on the thickness of your fish. Remove from pan and drain off excess oil with paper towel.
  • Finish your sauce by adding vinegar and brown sugar. Bring to the boil then simmer until the sauce is the consistency that you like. Remove from heat.
  • To serve, spoon the sauce on the serving platter and place the cooked fish on top. Season with pepper and serve with steamed rice.

Notes

  1. Fish options: I like using snapper, barramundi, swordfish and coral trout. Any white fish will do.
  2. Cooking method for fish: You can fry, grill, bake or steam.
  3. Make-ahead. You can make the sauce in advance and just cook the fish on the day. Makes it a lot easier and the sauce keep every well in the fridge in an airtight container for 3-5 days.

I was born in Manila, and as a chef, I wish I could say that I cook amazing Filipino food, but I’ve mostly cooked Western food my entire life. One thing I could say is, I have tried to incorporate Filipino flavours especially in baking. Although sometimes, that feels a little bit like taking the easy way out. I am proud of my heritage, and maybe someday I would go back and learn more about native ingredients and incorporate them in my cooking as well.

Here, I’m sharing with you my ube cheesecake recipe La Viña style. What is it? You know how a crustless, burnt cheesecake have been trending for a few years? One that is more commonly know as Basque Cheesecake? Well, this is the ube version, with homemade ube jam as well. I call it La Viña cheesecake because that’s the name of the restaurant in San Sebastian where people flock to have a taste of the original version. It is a crustless cheesecake that is caramelised outside and soft in the middle.


View this post on Instagram


A post shared by Joanne | Mrs.FancyPants (@mrs.fancypants.recipes)

If you want the original recipe as per the video above, I published my easy to follow recipe here. Just remember whichever version you are making, start with room temperature ingredients so the batter incorporates quickly and you will not get a lumps. The idea is to get a caramelised outside that serves as your crust, so this entails baking at a very high temperature. I preheat my oven to 220C and line a 23cm or 9in springform with baking paper and ensure there is an overhang. The overhang protects the cheesecake from getting too burnt too fast, and it also supports the cheesecake when it puffs up, which prevents overflowing.

Now with the ube version, it is also straightforward to make with the addition of making your own ube jam. Why would you want to make an ube version? Because my recipe of this is absolutely delicious and the natural purple colour of ube gives this (and basically most ube desserts) a really pretty purple hue. Ube jam is basically cooked ube, pureed and mixed with milk and sugar and cooked until its thick like peanut butter or Nutella. Let your ube jam cool to room temperature before using it for the cheesecake. I use all the ube jam yield in this recipe, but feel free to double the batch because it is really nice on warm bread rolls with a touch of butter.

To make the cheesecake, combine the ube jam, cream cheese, eggs, cream and sugar in a large bowl. Mix until smooth then sift over flour and fold in until incorporated. Pour the batter in your lined springform and bake for 1 hour. The cheesecake will still be jiggly in the centre. Remove from oven and let cool on a rack for at least 2 hours. Serve at room temperature to retain that soft, custardy texture. If you have leftovers, you can eat it as is or reheat in the microwave for 10sec per slice to get that softness back.

The detailed recipe is below for you to try. I would love to see your finished products, so tag me on your social media posts @mrs.fancypants.recipes or use #mrsfancypantsrecipes. If you have any questions, feel free to comment below. ???? Happy baking!

 
Difficulty: Easy

Ube Cheesecake à la La Viña

Makes 1 x 23cm springform

My ube variation of the famed Basque burnt cheesecake!

Ingredients

    For the ube jam (halaya)
  • For the cheesecake

Instructions

0/7 Instructions
    First make the ube jam:
  • Place ube and water in a small saucepan. Bring to a boil over medium heat, lower heat to a simmer, and cover. Simmer until ube most of the water has evaporated.
  • Remove from the pan and transfer to a large bowl. Use a masher to finely mash the ube, or if using grated ube, this step shouldn't be necessary. Push through a fine sieve for a really smooth texture, optional.
  • Mix together mashed ube, milk, and sugar then transfer to a frying pan. Cook over low heat, stirring constantly to avoid burning for 30 minutes uncovered. Add butter cubes and continue cooking until the ube has a deep purple colour and very thick consistency similar to peanut butter spread. Cool down to room temperature.
  • Make the cheesecake
  • Start with room temperature ingredients. Preheat oven to 220C. Line a 9” springform with baking paper, make sure you have an overhang of at least 5cm.
  • Mix cream cheese, ube, sugar and cream. Add eggs one by one, fully incorporating after each addition. Sift flour into the batter and mix just until the flour is incorporated. Do not over mix.
  • Pour into the pan and bake for 60 minutes. The top should be caramelised but cheesecake should be jiggly.
  • Take out of the oven and rest for at least 2 hours at room temperature. Serve warm, consume immediately. (see notes if making ahead)

Notes

  1. Note on UBE: This can be purchased from Asian/Filipino stores. If fresh ube is unavailable, you can use grated ube.
  2. Note on milk: I use jersey cow milk because there's no carabao milk available in Australia. But you can use normal full cream milk from the supermarket. Light or skim milk doesn't give the same richness to the ube jam.
  3. For leftovers: If you have leftovers, you can eat it as is or reheat in the microwave for 10sec per slice to get that softness back.
  4. Update on sweetness: To make the cheesecake less sweet, you can reduce the sugar in the ube jam by 50g.

I think every Filipino family has their own version of every Filipino dish. This is then passed down to offsprings and so on. I say this a lot because it’s true, food has a very big role in Filipino culture. We love to eat and we show our love through food, and the best way for us to bond is by sharing a meal.

Growing up, my mom was never very experimental with her cooking, but she had a handful of specialties. If she reads this, she’d probably say that she taught me how to cook, and to be fair, she taught me her staple dishes. Like her spaghetti, macaroni salad, potato salad and caldereta. I think this is also so that I can take over the cooking, but I moved to Macau, then to Sydney, so she’s still the one that cooks at home until now.

So the recipe below is my mom’s caldereta with coconut milk. Caldereta is a spicy beef stew, normally made with liver spread (liver pate), but this version doesn’t use that. My mom initially taught me to make caldereta and finish it with grated tasty cheese and that was the version that I grew up eating more, then she started cooking this version more, which uses coconut milk to finish the dish. My husband loves the coconut milk version, so that’s what I cook here.

https://www.instagram.com/p/CF1jRNMBEgI/?utm_source=ig_web_copy_link

Also, the protein used varies between goat and beef in the provinces, but I never really tried goat, and I always make this with beef. I should try using lamb one day, then I’ll let you know how it fares. That could be my Aussie version of a caldereta!

Anyway, I’ve tweaked my mom’s version by sealing the beef first before braising it so the beef doesn’t lose it’s flavour. I also put mirepoix in the braise and use beef stock, all to give the dish ample flavour. I strain the mirepoix off before adding the rest of the vegetables, so there won’t be the odd mushy carrot in there. This dish takes some time to cook, but very well worth it. I like cooking this in a dutch oven like the ones below, these are perfect for slow cooking. If you don’t have one, don’t worry, if you watch the video, I used a normal deep and wide sauce pan which I’m sure everyone has. I then serve it with plain rice, but if you really like coconut, my recipe for fluffy coconut rice can be found here.

Click on the photos to shop for the products. Most products ship internationally.

Mrs.Fancypants earns a small commission from affiliate links, when you buy the products above. If you’re in Australia, feel free to check the availability on advertised sites.

Now, if you’re busy and you don’t have time to wait hours at home, you can make this dish using a slow-cooker. They are very convenient, and have great features like setting the cooking time and keeping the food warm, so it’s ready when you get home. Here are some options, the one on the left is pretty basic, while the one on the right has all the bells & whistles.

Click on the photos to shop for the products. Most products ship internationally.

Mrs.Fancypants earns a small commission from affiliate links, when you buy the products above. If you’re in Australia, feel free to check the availability on advertised sites.

So I hope you try this hearty recipe. If you’re not Filipino, and not used to the flavours this is a good introductory dish to accustom your palate to what Filipino food is like. The cuisine is very diverse, ranging from light salads and raw fish cooked in vinegar, to hearty stews like this one. We also use a lot of strong flavours and some dishes have fairly strong aromas, so this dish is a good entry point because it has a tomato and beef stock base.

 
Difficulty: Easy Prep Time: 20 Mins Cook Time: 1 Hr 30 Mins Total Time: 1 Hr 50 Mins

My Mom’s Caldereta

(Filipino Beef Stew)

Serves 6

Ingredients

Instructions

0/3 Instructions
  • Season beef. Heat oil in a large, deep, wide pan. Brown beef on all sides, take out of the pan. Set aside.
  • In the same pan, sauté onion, 1 carrot & celery until caramelised. If there is too much oil in the pain, drain this off to prevent your sauce becoming too oily. Pour the stock into the pan and using a wooden spoon, scrape the bottom of the pan. Put the beef back into the pan, bring to the boil then slow down to a simmer. Partially cover with a lid so the liquid doesn't evaporate too quickly, and cook until beef is tender (at least 1 hour, if you use good quality beef). Skim all the impurities and fat that come up to the surface frequently.
  • When beef is ready, strain the liquid into a container big enough to hold it then discard the vegetables. Put the beef and the liquid back into the pan and then stir in tomato paste. Add the rest of the carrots and potatoes, then simmer until the vegetables are cooked. Add the olives and chili then stir in the coconut milk. Season to taste. Serve with steamed rice.

Notes

  1. This recipe is freezer-friendly. To freeze: portion the stew into airtight containers, cool down completely with no lid, place the lid on then freeze. Keeps up to 3 months. Thaw in the fridge overnight before heating up, heat up gently, or the coconut milk might split.


My husband recently celebrated his birthday, and despite going to the gym everyday and being fit, he has a massive sweet tooth. So every year I bake him a cake (or maybe 2 depending on how many parties we’re having) and this year, he requested that the cake has ube (pronounced oo-beh). It’s his favourite Filipino food next to longganisa and my mom’s Filipino spaghetti.

What is ube? Ube is classified as a tuber, same as sweet potato, potato, yam, taro, etc. Specifically, ube is a variety of purple yam native to the Philippines. It has a vibrant purple colour and is a favourite ingredient by Filipinos to use in desserts. In the last decade, ube has gained popularity in the western palette as well, because of it’s mild and nutty flavour. Personally, I feel like the Europeans would recognise the flavour because it’s a little bit similar to chestnuts, but a different texture.

How to use ube? It’s very versatile, much like the sweet potatoes, yams and pumpkins in America during Thanksgiving, we can use it in cakes, jams, pies, ice cream, you name it, and there is probably an ube flavoured version of it. You can find my ube recipe’s here. Or if you want to try this ube cake and you’re in Sydney, you can order it below:


Going back to the cake, the base is a coconut and purple yam chiffon cake with stabilised whipped cream frosting and coconut and ube filling. The cream will set and hold for 2-3 days, and in my experience, this cake gets eaten much faster than that period. I used ube flavour and added sweetened ube to give it a good flavour kick, but the sweetened ube is optional. This cake is not sickly sweet, so it’s popular to those who are looking after their sugar intake. The cake is also very light because it’s a chiffon, so great for those who don’t like rich desserts.

So now you can scroll down and find the full recipe and my notes. Chiffon cake is fairly straight forward to make, and if you follow the instructions, it would be a breeze for you. I would love to know if you made this and how you liked it, so please connect with me on Instagram, and use #mrsfancypants so I can see your baked goodies!!!

I get a lot of questions about stand mixers, and these are my recommendations. It comes with a caveat though, I only recommend you get one if you bake a lot because they are not cheap. Otherwise, a hand mixer is the more practical option.

Click on the photos to shop for the products. Most products ship internationally.

Mrs.Fancypants earns a small commission from affiliate links, when you buy the products above. If you’re in Australia, feel free to check the availability on advertised sites.

 
Difficulty: Difficult Prep Time: 15 Mins Cook Time: 35 Mins Total Time: 50 Mins

Sweetened Coconut and Purple Yam Cake

Makes a 2 layer 8-inch cake

Ingredients

    For the chiffon cake
  • For the filling, see notes
  • For the whipped cream frosting

Instructions

0/12 Instructions
    Make the cake
  • Line the bottom of 2 8-inch cake tins with baking paper. Do not grease the sides of the tin. Preheat oven to 170C. In a bowl, whisk egg yolks, coconut oil, ube flavouring, ube puree (if using) and milk until smooth. Set aside.
  • In a big bowl, sift together flour, corn flour, half of the sugar and baking powder.
  • In the bowl of your stand mixer, sprinkle cream of tartar on top of egg whites then start to whisk on medium until frothy.
  • Gradually add sugar, then keep whisking on medium speed until all the sugar is dissolved and the meringue is glossy.
  • Make a well in the centre of the dry ingredients and pour the egg yolk mixture. Mix until incorporated then fold in 1/3 of the meringue. Fold until the mixture is smooth. Do this three times until the meringue is finished.
  • Divide equally between the 2 cake tins then bake at 170C for 30-35 minutes. Do not open the oven while cake is baking.
  • The cake is done when a toothpick inserted comes out clean. Invert the tins and cool upside down on a cooling rack.
  • Make the filling and frosting
  • While the cake is cooling, make the filling. Mix the ube and condensed milk until the colour is even then add the desiccated coconut. Set aside.
  • Now make the whipped cream frosting. Put the water in a small bowl then sprinkle the gelatine on top, mix just until all the granules are wet. Set aside for 5 minutes.
  • Heat 100 ml of cream then mix the gelatine in until it dissolves. No need to boil the cream you just need to dissolve the gelatin. Cool down to room temperature before use. Whisk the rest of the cream and sugar until soft peak then slowly add the cream with gelatine. Whisk until stiff then keep in the fridge until needed.
  • Assembly
  • When the cake is cooled down completely, trim the tops if domed. Put a dollop of cream on the cake plate then put one layer of cake trimmed side down. Spread a good layer of frosting on top of the cake and even it out. Top with half the filling then top with the 2nd cake trimmed side down.
  • Now spread a thin layer of frosting all over the cake and even it out, then chill for at least 45 minutes. The first layer of frosting would've set at this stage and will hold the crumbs in place so your cake will be crumb free when it's finished. Now use the rest of the frosting to cover the cake then make rosettes around the top. Fill the centre with the rest of the filling. Chill until ready to serve.

Notes

  1. You can use ube powder instead of ube flavouring. The ratio is 1:1.
  2. If coconut oil is not handy, use any neutral flavoured oil but the cake will not have any coconut flavour.
  3. If you do not want to make the filling. You can substitute  sweetened coconut sport (macapuno). Drain the syrup and mix the coconut sport with ube flavouring, no need to add condensed milk.
  4. Tips for success: This is overwhelming to make by itself for first timeEd, so focus on making this cake and don’t skip steps. A cake takes a few hours to completely cool down, so either make it a day ahead or in the morning.

Tags

#cake  #ube  


I remember the local bakeries in the Philippines, there would be one in every corner, and they would sell the same type of bread. When I was a kid they would sell most of the bread for one peso each, and the special ones for 3 pesos and up. Bread for tea time is very common in the Philippines when I was growing up, and there’s such a wide variety that we could have different ones everyday of the week and still not go through all of it.

Today, I’ll tell you about the simplest and most common. It’s called pan de sal. We used to have pan de sal for breakfast with condiments like butter and jam or we have it for merienda or tea time, paired with stir fried noodles. Yes, you read that right, we have noodles and bread rolls at tea time. Pan de sal dough is also used as the base for a sweet bread roll called Spanish bread. Spanish bread is normally paired with coffee because it has a butter and sugar filling, so it won’t go down well with noodles.

Spanish bread and pan de sal are two of the breads that you will find in 95% of the local Philippine bakeries, and today I’m sharing with you the recipes for both. I do apologise for the lack of explanation on the bread names. I really don’t know why they are called such. Pan de sal is not even salty and Spanish bread did not come from Spain… Go figure. ?

I’m sharing these recipes with you because they bring me back to my childhood. These days, because I have a little more free time than normal, I am able to think about my childhood more and I feel a little bit more connected to my roots. If you’re like me, who has lived in different countries, maybe you understand what I’m talking about. Being able to stop and reflect on my life and remember what growing up was like was one of the few good things this pandemic and lockdown has brought about, and I hope some of you also took the time to do the same.

So here are the recipes for these very delicious Filipino bread rolls, you will find the pan de sal recipe first then the Spanish bread recipe follows. I make one recipe for the dough and use half for pandesal and half for Spanish bread because our household size is quite small. If you do this, make sure you only make half the filling. It will make 14 pandesal and 9 Spanish bread. I even made a video to guide you along!

Let me know if you try the recipe and what you think. Also, don’t forget to use #mrsfancypants to get featured on social media!

https://youtu.be/5hLSJ1qwsVo

Equipment notes:

At home, I always use my stand mixer when I make bread, it’s just a pain-free and mess-free alternative to kneading the dough on the bench top. I own the Kenwood Chef XL and I love it. It has a powerful 1400W motor and a large mixing bowl that can hold 6.7L. Now if you’re a Kitchenaid fan, then I would suggest getting the Kitchenaid Pro Line because it’s more powerful than the artisan at 500W and has a bowl that can take up to 6.9L of liquid. I once worked in a kitchen that uses this mixer and it wasn’t too bad. Click the links or the photos below to shop at Myer & The Good Guys.

I get a lot of questions about stand mixers, and these are my recommendations. It comes with a caveat though, I only recommend you get one if you bake a lot because they are not cheap. Otherwise, a hand mixer is the more practical option.

Click on the photos to shop for the products. Most products ship internationally.

Mrs.Fancypants earns a small commission from affiliate links, when you buy the products above. If you’re in Australia, feel free to check the availability on advertised sites.


Difficulty: Medium Prep Time: 1 Hr 40 Mins Cook Time: 10 Mins Total Time: 1 Hr 50 Mins

Pandesal

Makes 2 dozen

Pan de Sal is a Filipino bread roll that is normally served warm with condiments during breakfast but also sometimes during afternoon tea or merienda alongside stir fried noodles or pancit. This recipe makes a 24 pcs. and was adapted from Woman Scribbles.

Ingredients

Instructions

0/8 Instructions
  • In your stand mixer bowl, mix together the dry ingredients (yeast, sugar, salt and flour)
  • In a second bowl or a measuring jug, mix wet ingredients except 1/4 cup milk.
  • Attach the dough hook to your mixer and slowly mix the wet ingredients into the dry ingredients on low to medium speed. See if the mixture looks dry and add the remaining 1/4 cup milk gradually until the mix looks doughy.
  • Knead the dough for 10-15 minutes on medium speed or until the gluten is developed. You will know that the dough is ready when you take a small bit of dough and stretch it and it doesn't tear, and the dough is smooth and pulls away from the sides of the bowl.
  • Cover and let rise in a warm place for 45 minutes or until doubled in size.
  • Punch down the dough and divide into 24 balls of 45g grams each. If you don't have a scale, supply divide into 28 equal-sized balls.
  • Roll into small ovals then roll in bread crumbs. Place on cookie sheets with a little space in between to give them room to expand. Cover and let rise for 30-40 minutes or until doubled in size. Preheat oven to 170C.
  • Bake at 170C for 10 minutes or golden brown. Serve warm with softened butter and condiments.

Notes

1. Milk should not be over 37C or the yeast will die.

Difficulty: Medium Prep Time: 1 Hr 30 Mins Cook Time: 10 Mins Total Time: 1 Hr 40 Mins

Spanish Bread Recipe

Makes 18 rolls


Spanish bread is a Filipino soft bread that is best described as a rolled pan de sal with butter & sugar filling. Served during morning or afternoon tea or merienda, it is also one of the staple items sold at the neighbourhood bakeries in the Philippines. This recipe makes 18 pcs and was adapted from Woman Scribbles.

Ingredients

    For the dough:
  • For the Filling:

Instructions

0/7 Instructions
  • Make the pan de sal dough as instructed in the recipe, until the first rise.
  • While the dough is rising, make the filling. Warm up the butter in a sauce pan until it's bubbling vigorously, then add the flour. Cook the flour out for 3-5 minutes on medium to high heat. This way your filling will not taste like raw flour.
  • Add the breadcrumbs, sugar and milk. Stir until incorporated then cover and set aside.
  • Punch down the dough and divide into 18 balls of 60g each. Again, if you do not have a scale, just divide the dough into 18 equal portions.
  • With a rolling pin, roll out each ball into an oval shape about 2mm thick and spread a tablespoon of the filling. Then roll up and put on a cookie sheet. There should be just enough filling for 18 rolls.
  • Repeat for all the portions and make sure you leave enough space between each roll for proofing. Cover and set aside in a warm place. Leave to rise for 30-45 minutes or until doubled in size.
  • Preheat oven to 170C. Brush each roll with milk then sprinkle breadcrumbs on top. Bake for 12-15 minutes or until golden. Serve warm.